Purpose
This guide shows how to configure a Cisco Meraki device (MR series) for Cloud4Wi Guest WiFi and Cloud NAC solutions, including setting up SSID used Captive Portal onboarding and the SSID for 802.1X/Passpoint.
Create the Captive Portal SSID for guest WiFi service or if you are using the captive portal as onboarding channel for your employees (BYOD). Configure the 802.1X/Passpoint SSID to provide Passpoint/OpenRoaming access to your guests or secure access to your Trusted Users.
- Captive Portal SSID configuration
- 802.1X/Passpoint SSID Configuration
- Provisioning Access Points to Cloud4Wi dahboard
Please note that the images and screenshot contained in this article may contain outdated configuration data. Therefore, please check the data in the article "Intro to WiFi network configuration" to retrive the configuration parameters such as RADIUS servers, hotspot 2,0 data, captive portal url.
Captive Portal SSID configuration
Prerequisites
Dear Meraki support,
I'd like you to get the access to the features described below:
Splash Page: https://documentation.meraki.com/MX-Z/Access_Control_and_Splash_Page/Splash_Page
Access Control: https://documentation.meraki.com/MX-Z/Access_Control_and_Splash_Page/Access_Control
Walled Garden: https://documentation.meraki.com/zGeneral_Administration/Cross-Platform_Content/Walled_Garden
Radius Accounting: https://documentation.meraki.com/MR/Splash_Page/Configuring_RADIUS_Authentication_with_a_Sign-on_Splash_Page
I'm setting up my Meraki Dashboard to be used with Cloud4Wi service (https://marketplace.cisco.com/catalog/solution/154406?pid=157939) and these features are required.
Please update the device's firmware at your earliest convenience.
Thank you in advance.
Please check that the router is connected to the Internet.
You may choose to configure the device to receive and install last firmware updates automatically.
Setting your SSID and access controls
The first step is configuring the SSID of the access point.
Select Wireless in the drop-down menu and then click SSIDs under the Configure subsection.
Then select the SSID you intend to use for the Captive Portal service. If you want to use an inactive SSID, please click on Show all my SSIDs.
If your network is disabled, please enable it (or you can enabled it later when you are ready to go live)
You can rename the SSID at your convenience by clicking rename.
Then, click edit settings, to access the Access Control page for this SSID .
You can also reach this page directly from Wireless > Configure > Access Control and selecting the desired SSID form the dropdown at the top of the page.
- Find the Security section and select Open (no encryption)
- Find the Splash Page section and select Sign-on with my RADIUS server
- Find the RAIDUS servers section. Click Add server and add two entries, for the primary and secondary RADIUS Servers using the parameters provided in your Cloud4Wi Dashboard in Manage > Preferences > WiFi Service (read more)
-
Scroll down to the RADIUS accounting servers section. Click Add server and add the two entries for the primary and secondary RADIUS accounting server, using the value provided in the Cloud4Wi dashboard (read more)
-
Set the other options as following:
- Accounting interim interval: 4 minutes
- Accounting start delay: 0 minutes
- RADISU CoA Support: enabled
- Dashboard RADIUS proxy: disabled
- RADIUS attribute specifying group policy name: Filter-Id
-
Under Advanced RADIUS settings (if present) configure:
Called-Station-ID 1 - AP MAC address (remove any others) NAS ID 1 - AP MAC address (remove any others) Server timeout: 5 seconds Retry count: 3 - You also must set the complete access to the Internet only for authenticated end-users. To do this, you must set Captive portal strength to Block all access until sign-on is complete.

-
Next, you have to configure the walled garden, that is the list of hosts or IP addresses ranges that can be visited by end-users even without being authenticated.
To use this feature most effectively, we recommend making a request to Cisco Meraki asking for the activation of the "walled garden" feature. Doing this, you will be able to enter not only hostnames but even IP address ranges (by using CIDR notation) and subdomains (by using domain wildcards).After the activation of this feature, a tip below the Walled garden input will indicate the right syntax to enter new domains.
Add the following values:- c4wstatic.cloud4wi.com
- c4wstaticjs.cloud4wi.com
- *.cloud4wi.com
If you have a white label version, you need to add the wildcard for the domain used on your Splash Page URL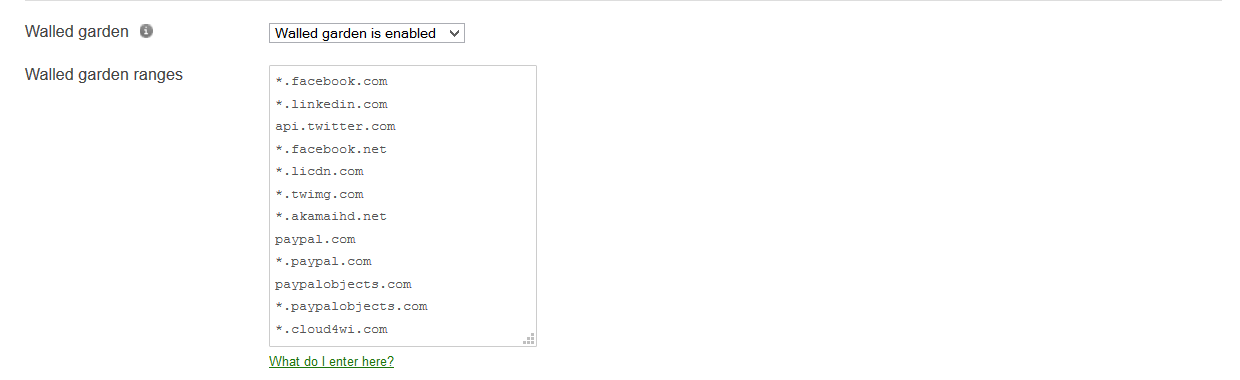
-
To configure the walled garden to support Social Login, payment or SSO capabilities, please check the following articles:
- For Simultaneous logins, you have to set "Allow simultaneous devices per user".
- Go to IP and VLAN section. You can choose the NAT mode or Bridge mode according to your favorite network configuration.
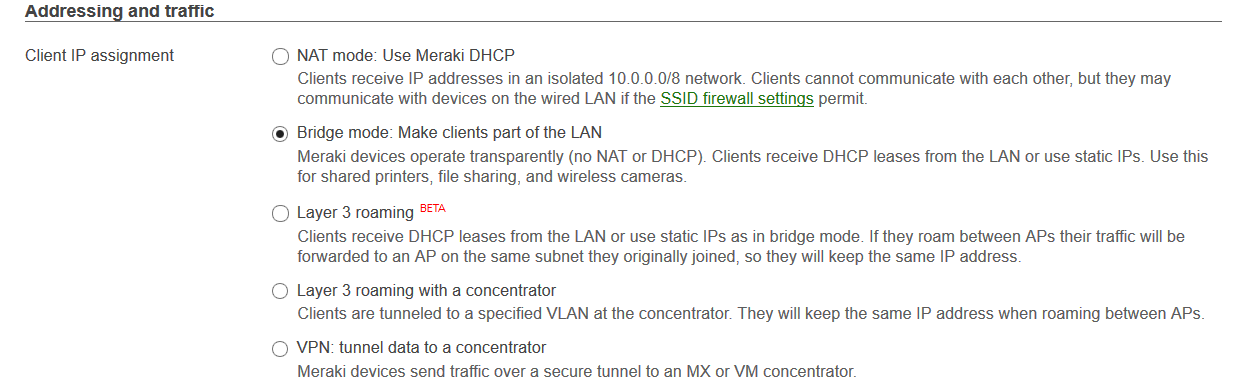 If required, it is possible to set VLAN tagging, to direct traffic to specific VLANs.
- Click Save Changes.
Configuring the Splash page
Finally, we need to set the Splash Page. To retrieve the Splash Page URL for your account, go to the Cloud4Wi dashboard, Manage > References > Wi-Fi service, and copy the Global Splash Page URL parameter.
Go to the Splash page page on your Meraki dashboard form Wireless > Configure > Splash Page. In the next page, please select the SSID you configured for the CLoud4Wi guest wifi service..
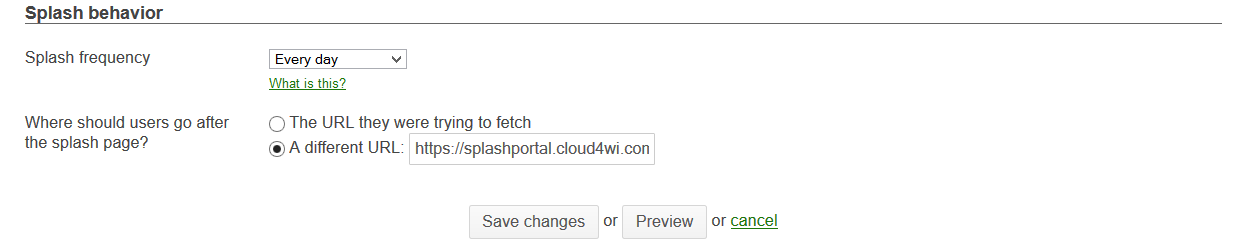
Find the Custom splash URL section and in the input next to the label "Or provide a URL where users will be redirected:" enter the Global Splash Page URL that you obtained in your Cloud4Wi dashboard.

And under Splash behavior, in the input field called Where should users go after the splash page? select A different URL and enter the same value as your Global Splash Page URL
802.1X/Passpoint SSID configuration
Prerequisites
Dear Meraki support,
I'd like you to get the access to the features described below:
Radius Accounting: https://documentation.meraki.com/MR/Splash_Page/Configuring_RADIUS_Authentication_with_a_Sign-on_Splash_Page
I'm setting up my Meraki Dashboard to be used with Cloud4Wi service (https://marketplace.cisco.com/catalog/solution/154406?pid=157939) and these features are required.
Please update the device's firmware at your earliest convenience.
Thank you in advance.
Setting your SSID and access controls
The first step is configuring the SSID of the access point.
Go to Wireless > Configure > SSIDs.
Identify the SSID you want to use for this cofniguration. If you want to use an inactive SSID, please click on Show all my SSIDs.
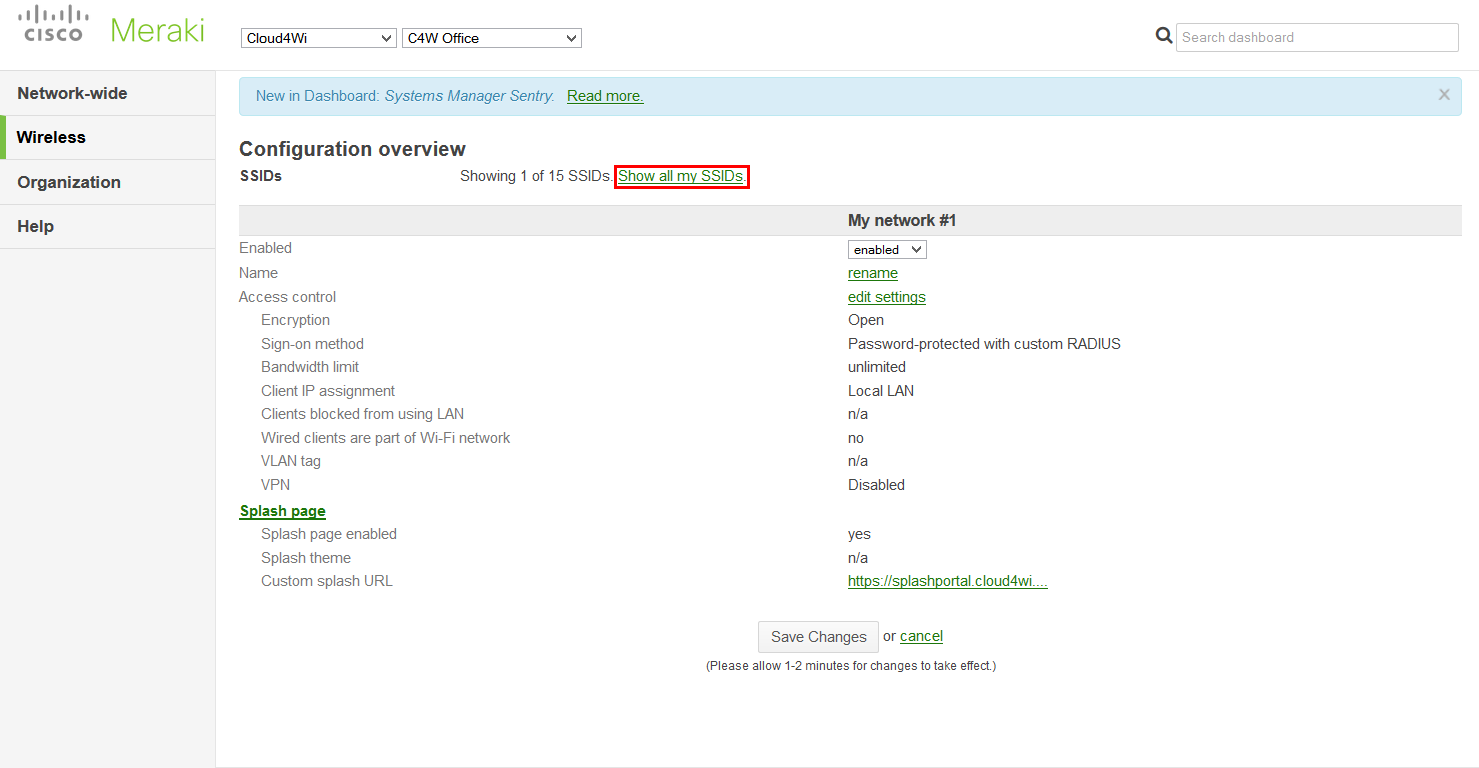
You can rename the SSID at your convenience by clicking rename.
Then, click edit settings, to reach the Access Control page for this SSID to configure access settings.
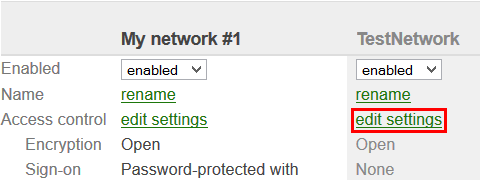
- Find the Security section and select Enterprise with my RADIUS server
- In the Splash page section, select "None"
- Find the RAIDUS servers section. Click Add server and add two entries, for the primary and secondary RADIUS Servers using the parameters provided in your CLoud4Wi Dashboard in Manage > Preferences > WiFi Service (read more)
-
scroll down to the RADIUS accounting servers section. Click Add server and add the two entries for the primary and secondary RADIUS accounting server, using the value provided in the Cloud4wi dashboard (read more)
-
Set the other options as following:
- Accounting interim interval: 4 minutes
- Accounting start delay: 0 minutes
- RADISU CoA Support: enabled
- Dashboard RADIUS proxy: disabled
- RADIUS attribute specifying group policy name: Filter-Id
-
Under Advanced RADIUS settings (if present) configure:
Called-Station-ID 1 - AP MAC address (remove any others) NAS ID 1 - AP MAC address (remove any others) Server timeout: 5 seconds Retry count: 3 - Go to IP and VLAN section. You can choose the NAT mode or Bridge mode according to your favorite network configuration.
If required, it is possible to set VLAN tagging, to direct traffic to specific VLANs. Cloud4Wi can dynamically assign VLAN via RAIDUS (see Cloud4Wi Group Policies)
- Click Save Changes.
Hotspot 2.0 settings
From the Cisco Meraki Dashboard, select Wireless > Configure > Hotspot 2.0.
The Hotspot 2.0 page appears. Select the SSID that you previously created with the WPA3-Enterprise settings.
Configure the following parameters:
- Hotspot 2.0: Enabled. This activates the rest of the fields on the page.
-
Operator name: CLOUD4WI:US
- Venue name: any value, including “unspecified”, don’t leave it empty
- Network type: free public network
- Domain list: enter your domain as configured in the Passpoint settings (such as brand.securewifi.io)
Next to NAI Realms, click Create Realm. The Create NAI Realm dialog box appears.
Enter the following parameters:
- Format: 0
- Name: enter your domain as configured in the Passpoint settings (such as brand.securewifi.io)
- Then click Add an EAP method and enter the following information:
- Method ID: 21
-
Authentication Methods: MSCHAPv2, PAP, MSCHAP
-
Click Create Real to confirm.
The realm will appear in NAI Realms table:
Click Save Changes at the bottom of the screen.
OpenRoaming (if desired)
To also enable OpenRoaming
- in the Roaming Consortium OI 1 write “5A03BA0000”.
- in the Roaming Consortium OI 2 write "004096".
- Click Save
Known issues with Meraki hotspot 2.0
Sometimes, Meraki stops broadcasting Hotspot 2.0 parameters, therefore devices with provisioned WiFi profiles won't recognize the network.
The problem has been detected occasionally when changing certain settings of a network, such as adding an SSID or changing the access control configuration of any SSID. When Meraki propagates those changes to the network, the APs seem to stop broadcasting Hotspot 2.0 information.
A workaround to fix this problem is to go to the Hotspot 2.0 page, change some parameters such as the Venu Type, and Save. Meraki will propagate the new configuration to the network and Hotspot 2.0 will start working again. If this operation does not solve the problem, try also to restart the Access Points.
Provisioning Meraki Access Points into the Cloud4Wi Dashboard
For Cisco Meraki devices, the Cloud4Wi Dashboard requires only the MAC address. If you need help in finding the MAC address of your device, please check the following article from Cisco Meraki documentation: Locating the MAC address of Cisco Meraki devices.