Click-through is a passwordless registration method for the Cloud4Wi Splash Portal. Users can connect without creating a username and password. Depending on the Login Profile configuration, they may only need to select Go Online and accept the applicable policies, or they may be asked to provide registration information before accessing the network.
The platform maintains a contact record for the user even though the user does not create credentials during registration.
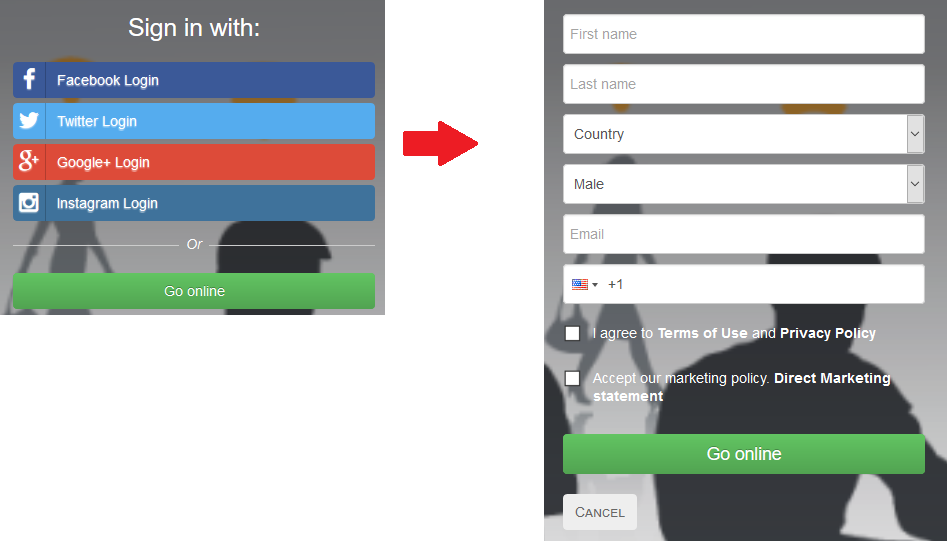
Configure Click-through registration
In Guest Wi-Fi > Setup > Login Profiles, open a Login Profile, select the Login options tab, and configure the registration experience:
- For Single-step, set Primary Sign-Up > Sign-up to Click-through.
- For Multi-step, select the Multi-step experience to configure two Click-through steps separately.
For the complete list of settings, see Login Profile configuration and options.
Registration fields and mandatory fields
Registration fields determines which personal-data fields appear in the Click-through form, such as first name, last name, email, or phone number. Mandatory registration fields determines which of those fields users must complete. In the Multi-step editor, these settings are called Form Attributes and Mandatory Attributes.
If no registration fields are selected, the Click-through form can be completed without providing personal data, subject to the configured agreements and any applicable access-verification requirements. When fields are selected, users must complete the mandatory ones before continuing.
Phone number validation
When the Phone number field appears in a native Splash Portal form, the user can select a country and its international calling code. When the user attempts to continue or submit, Cloud4Wi checks whether the entered number is valid for the selected country. The check supports both mobile and fixed-line numbers; it does not display validation errors while the user is typing.
If the number is invalid, the form prevents the user from continuing and displays “Please enter a valid phone number.” An optional Phone number field can be left empty; a required field left empty uses the standard required-field validation. This is a format check, not confirmation that the number exists, is reachable, or belongs to the user. Phone-number ownership verification through SMS is a separate feature.
Policy acceptance
The Policies tab of the Login Profile defines the Terms of Use, Privacy Policy, and any other applicable agreements. With Explicit acceptance, users must select the relevant checkbox before proceeding. With Implicit acceptance, the page displays an explanatory statement and users accept by proceeding, without a separate acceptance checkbox.
Marketing consent, policy versioning, and any requirement for returning users to accept updated clauses depend on the policies configured in the Login Profile.
Single-step and Multi-step Click-through
Single-step
In a Single-step experience, the registration fields and applicable agreements are presented together. Users complete the required fields, satisfy any configured verification requirements, and continue to network access.
Multi-step
A Multi-step Click-through experience separates onboarding into two screens:
- Step 1 collects the fields and agreements configured for the initial registration step.
- Step 2 collects additional information or offers a subscription, using its own fields and agreements. Fields and opt-ins already completed in Step 1 are pre-populated if they appear again in Step 2.
Step 2 can use either of these types:
| Type | User experience |
|---|---|
| Subscription | Users can select Submit to complete the second step or Skip to bypass the optional subscription step. |
| Enrichment | Users provide additional information and continue with Submit; no optional Skip action is offered. |
Returning users do not necessarily see Step 1 again. It can be displayed when required information is missing or when optional information is requested and Skip Optional Data Prompt for Returning Users is disabled. Otherwise, the user may go directly to Step 2.
Back navigation in Multi-step forms
Step 2 supports a Back button in both Subscription and Enrichment flows. The button is hidden by default and can be displayed through custom Splash Page CSS.
When enabled, Back is available only if Step 1 was actually displayed in the current flow, whether the user is new or returning. If a returning user skipped Step 1, Back is not shown. Selecting Back returns to Step 1 without clearing previously entered information.
For the CSS rule and instructions, see Splash Pages advanced personalization via CSS.
Returning users and device recognition
Click-through defines how users register; it does not determine how they are authenticated on later visits. The experience for returning users depends on Advanced > Access Control > Authentication Methods in the Login Profile.
| Method | Returning-user experience |
|---|---|
| Classic | The regular Splash Page is presented on each visit. |
| One-Click Login | A recognized device is offered a one-click connection without repeating registration, regardless of the user's original sign-up method. |
| Auto-Login | A recognized device is authenticated automatically without an additional action on the Splash Page. |
One-Click Login and Auto-Login use the device's MAC address for recognition. If that address changes, for example because of MAC address randomization, the device may no longer be recognized. Depending on the configuration, returning users may also be asked for missing required information or additional optional data.
For requirements and detailed behavior, see Auto-Login options for returning users and Login Profile configuration and options.
Other sign-in options with Click-through
Sign in with existing credentials
A Click-through Splash Page can also provide a Sign In Form for users who already have a username and password. This is useful when users connect from another device or cannot be recognized through their device's MAC address. Persistent credentials can be issued to users regardless of how they first registered.
The Sign In Form supports two presentation modes:
- In Form: the username/password fields appear directly below the Click-through form.
- Button: a Log in with your account link appears below the Click-through form. Selecting it opens the credentials form and hides the other authentication elements.
Enabling the Sign In Form does not automatically issue credentials. See Persistent Credentials: The Solution for Multi-Device and Long-Term Access for the related workflow.
Because Click-through does not create a password as part of its primary registration flow, the Username/password-specific password recovery and self-care portal options are not available as Click-through registration settings.
External identity providers
Click-through can be offered alongside External Service IDP (Social Login). Users can choose an available external identity provider instead of the Click-through registration path. Depending on the configuration and the information returned by the provider, the Splash Portal may still request additional registration fields.
Splash Page templates and presentation
When using a Splash Page template, you can display the Login box directly on the home page. To do so, create a Login content type and publish it in the desired block of the Splash Page.
Custom CSS can also change how Click-through fields are displayed, including showing the registration form directly on the home page. For examples, see Splash Pages advanced personalization via CSS. These presentation changes do not override the registration and authentication rules defined by the Login Profile.
Related documentation
- Login Profile configuration and options — registration fields, agreements, verification, and authentication settings.
- Auto-Login options for returning users — device recognition and authentication behavior.
- Persistent Credentials: The Solution for Multi-Device and Long-Term Access — signing in on multiple devices with credentials.
- Splash Pages advanced personalization via CSS — Click-through layout customization and enabling the Multi-step Back button.
- Validating end-users' phone number using a confirmation code — number ownership verification, distinct from format validation.